

Top Ten Tips For Painting With Glow In The Dark Paint

Click here to purchase our glow in the dark paint!
Thanks for checking out our top tips on how to paint with glow paints! Glow in the dark paint is extremely rewarding to work with but requires some special considerations to get the best results.
We've compiled this list from our firsthand experience and feedback from our customers in hopes of saving you time, frustration, and even some money. We've got lots to cover so let's get started!
TOP TIPS FOR PAINTING WITH GLOW PAINT
1. Most of our paints go on nearly invisible for the first few coats. The neutral glow paints will go on nearly invisible for the first two or three coats. The fluorescent colors shouldn’t be noticeable over a colored background in one or two coats but they may tint a white/light colored background. For more info specific to fluorescent glow paints please check out our blog post about their uses and limitations.
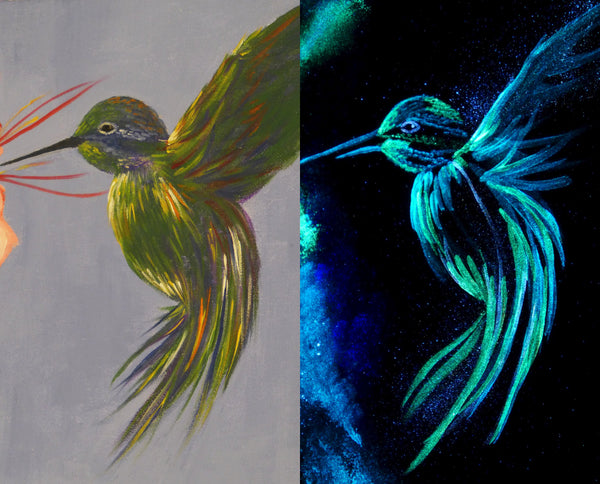
The following image has neutral aqua, sky blue, and green glow paints over regular acrylic paint. As you can see, the glow paints are invisible during the day but glow brightly in the dark with only a single coat.
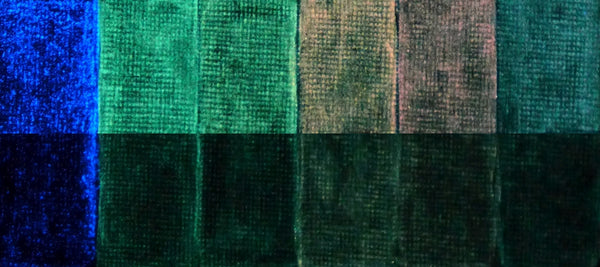
2. The lighter the background, the brighter the glow. Since most of the glow you see is actually reflected light, the lighter the background color, the brighter the glow will appear. The following image shows two coats of fluorescent glow paint over a white (top row) and black (bottom row) background.
3. Use less paint than you’re used to. Start with less than you think you’ll need on your brush, spread it thin, and then add more paint if necessary. Painting this way will avoid raised edges that glow brighter than the rest of the brush stroke.
A great way to implement this technique and get smooth brush strokes is to place your brush in the middle of where you want the final stroke to be and then pull the paint in opposite directions to create the stroke. It's not an intuitive technique and it's definitely not the only way to get great results, but many of our artists swear by this method.
4. Use a black light or ultraviolet flashlight to check the evenness of the brush strokes while they’re still wet. Since the paint goes on transparent, you won't be able to see if the paint you just laid down is consistently smooth or if it has slightly raised edges. You can easily check this, even in a brightly lit room, by looking at the paint under one of our UV LED flashlights (you may need to shade the image with your hand). Taking the time to do this will ensure that the edges of your stroke aren't brighter than the rest of it. You'll find yourself having to check this less and less as you figure out the correct amount of paint to apply to your brush and the canvas.
5. Let the paint dry for 10 to 15 minutes between coats. Rushing the second coat will actually remove the glow from the first coat and leave you with a dark spot. Please make sure the paint is completely dry before adding additional coats for the best results. You can also use a hairdryer on its low setting or a heat gun to speed up the drying process if you want.
6. Try additional coats for a brighter glow. Many people are happy with a single coat of glow paint but if you want it even brighter you can add another coat or two for maximum brightness. Additional coats after the first 3 will not make much of a difference in the brightness of the glow.
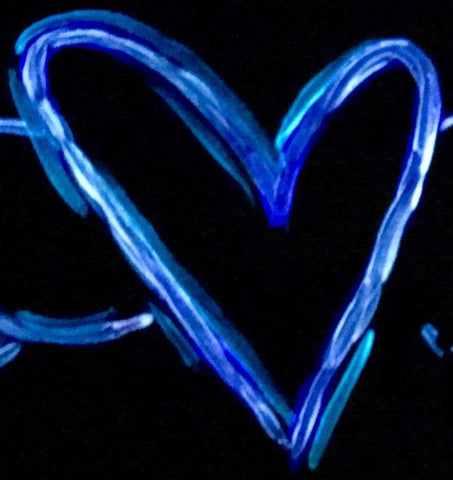
This neon sign painting has just two coats of each color over white paint. 
7. You can use a toothbrush and toothpicks to create three dimensional star field effects. Using paper or tape, mask off objects in the foreground so that they will appear to be in front of the stars after they’re applied. To apply the stars, dip the tips of the toothbrush bristles into neutral aqua or green glow paint, hold perpendicular to the canvas and with the bristles a couple of inches away run your thumb up the bristles towards you, away from the painting. This will flick hundreds of stars onto the painting! Use a toothpick to add some larger stars for a three dimensional effect.
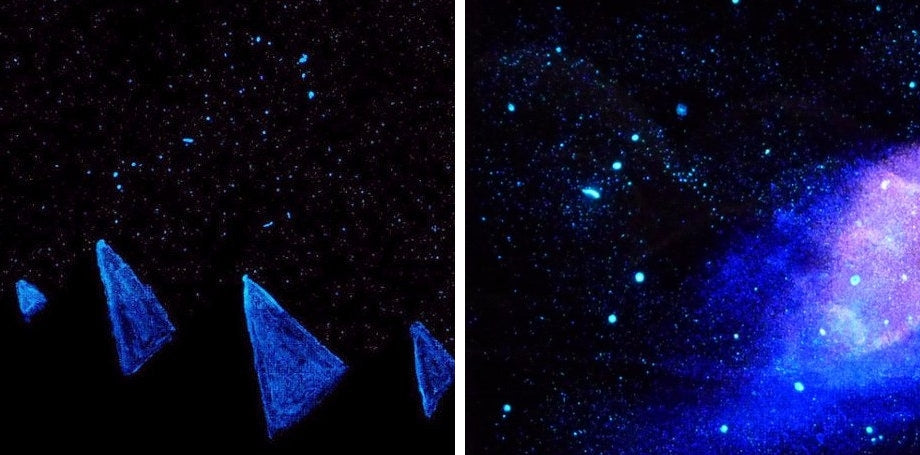
8. Get creative with tape and other materials. The mountains in the image below were masked off using painters tape so that the stars appear to be behind them. In both images some of the stars are noticeably larger than others which adds depth and realism to the image.
9. For best results, charge with an ultraviolet flashlight, black light, or the sun. Household lights will not charge the glow paint to its full potential so please charge your painting with one of our ultraviolet lights or the sun for the brightest, longest lasting glow!
10. Experiment and have fun! The possibilities with glow paints and powders are endless so get creative and don’t be afraid to try new things. Check out our project ideas page to get inspired by tons of glow in the dark projects and guides.

Check out all the different colors of Glow in the Dark Paint that we offer to start enjoying the magic of glow today! Don't forget a charging light so that you'll have everything you need to create your own glow in the dark painting.
Invite some friends over for a paint night or plan a birthday party that will be remembered for a lifetime. Whatever you end up doing, be sure to send us some pictures or tag us on social media! #artnglow @artnglow
We hope you found this guide helpful, but we know that there's a lot of information we didn't cover. If you have any questions, please let us know in the comments, by emailing us at info@artnglow.com. We love helping people out!
For a more in-depth guide on creating a glow in the dark canvas paintings, please check out our How To Guide.


Hi Kathy,
We would be happy to help you troubleshoot your glow-in-the-dark paint, because we would definitely expect an amazing glow. Please feel free to reach out with any specific questions.
Here are some tips that might help as well: Our glow paints are designed so that they go on nearly transparent for the first few coats. This allows them to be layered over regular paints to create hidden glowing details in paintings of all sorts! Since most of the glow you will see is actually reflected light, the glow will be much brighter over a white or light-colored background than over a black background. You can also increase the brightness of your glow by applying more coats – we recommend at least 2-3 for the optimal glow, but you can add as many coats as you’d like (allowing 10-15 min for the paint to dry between coats).
Our glow-in-the-dark products are best charged using sunlight, or UV light with a wavelength of 395+ nm. Having a UV flashlight or similar light source handy is great while painting, or to charge your finished painting at will! Regular indoor lighting is typically not strong enough to charge your glow paint to its full potential.
I have tried everything and I can’t get my glow in the dark paint to Glow
Hello Jenny,
You can use our glow paints directly on fabric, but keep in mind that they are acrylic paints and the application will result in stiffer fabric. You can also mix our glow powder in transparent fabric paint and apply to fabric. You will want to make sure that the fabric paint is transparent so that the glow powder can be charged and so the glow can shine through.
Hi-
Can glow powders or paints be mixed with fabric paints or used on fabric that is worn and washed?
Thank you
Hola Sebastian,
Nuestros polvos luminosos se pueden mezclar con poliuretano transparente. Nuestros polvos luminosos conservarán su capacidad de cargarse y brillar en estas condiciones.
Leave a comment