How to Make a DIY Resin Ornament: Geode Resin Art featuring @DripYourHeartOut

If you love to work with resin or want to give it a try for the first time, we think creating resin ornaments are the perfect project. Decorate your tree with your own DIY resin ornaments or give as gifts during the holiday season. This simple tutorial will show you how to create geode resin art ornaments. This technique that can also be used to create many unique pieces of art from canvas wall art to serving trays.
Materials Needed:
- Art ‘N Glow Resin
- Art ‘N Glow Pearl Pigments
- Unfinished Round Wood Ornaments
- Crushed Glass Pieces
- Glitter
- Metallic Paint Pens
- Plastic sheet
- Plastic Cups
- Spoons
- Artist's Torch
- Gloves
Let's get started!
Prep Workspace:
To prepare the workspace, you will need a table and place a plastic sheet over it. This will help you clean up your workspace easily. It is important to layout all of your materials and to be prepared. That way when you start mixing your resin and hardener, you have enough time to create multiple ornaments and a variety of colors if needed.
Step 1: Prepare your workspace so that all of your supplies are laid out. Once you are ready to start, make sure you are wearing gloves. Take your plastic cups and put them upside down on the table. Place the wood ornament on top of the cups. (This will help any resin to drip off of the side of the ornament).
Step 2: Carefully place your broken glass on top of the wood ornament to your desired design. Now start mixing your Art ‘N Glow resin as directed.
Step 3: Leave ¼ of your clear resin in a cup. To start preparing your colors, Siera recommends doing two colors for each ornament. For example: for one ornament you will need clear, a white pearl and a pearl pink color. I used a small amount of resin per each ornament so you will only need about a teaspoon of pigment per ¼ cup of mixed resin in each cup. Once your colors are combined with the resin, you can now start the pouring process.
Step 4: Take your clear resin mixture and a spoon, and drizzle the clear mixture over the broken glass. Next, take one pigmented color and a spoon, and drip a small amount over the wood area of the ornament. Repeat until all of the wood is covered. Once covered, use your torch and pass it over the top of the resin to remove bubbles. Let ornament sit for 48 hours to cure before completing the next step.
Step 5: After 48 hours has passed, take your paint pen and create lines along the resin and on the edges of the broken glass. Let dry then thread a ribbon through the ornament hole. It is finished and you can hang it on your tree to enjoy!
Pro tip: When creating these geode resin ornaments, the biggest thing to be aware of is to use a small amount of resin during the process where you pour the resin onto the unfinished wood ornament piece. Too much, and a lot of the product will be wasted, and it can also bleed into the broken glass changing the look of the finished product.
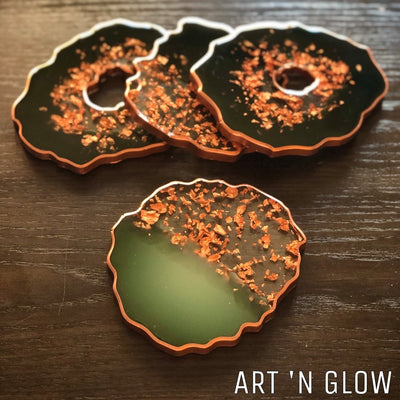
Types of Resin Geode Artwork created by Siera of @DripYourHeartOut


Follow This Artist:
Follow @DripYourHeartOut on Instagram
And check out Siera's geode art classes at: www.DenverArtClasses.com


Leave a comment