How to Make Resin Glitter Pens

Have you ever thought about making your own resin glitter pens? Have you been looking for a project that will be both fun and useful? Lydia of @clevergirlscraft is going to tell you how to make these fantastic creations! Gather your materials and give this cool project a try. You'll be glad you did!
What You Need to Make Resin Glitter Pens
Let's start with the basics. Here are the supplies that you need:

- Art ‘N Glow Epoxy Resin
- Any capped pens or markers as long as they have a smooth, uniform casing
- Paintbrush, preferably nylon bristles because they are less likely to shed
- Extra fine or ultra-fine glitter
- Mod Podge (you have the option of using a gloss or matte finish)
- Sandpaper, if necessary (preferably 150 grit)
- Safety gear
- Isopropyl alcohol (at least 90% pure)
- Box cutter
- Nitrile Gloves
- Pool Noodle
- Duct tape
- Cup turner
Prepping Your Pens

Let's start prepping our pens. Put some Mod Podge in a cup and set it aside for now. Here's when you'll sand off any logos or writing on your pens, but make sure you're careful. Wear a mask to avoid breathing in particles. If you don't sand them off, they will show through the glitter. So take your time and sand them away. After using some alcohol to clean the pen, you're ready to glitter it.
Making Your Pens
Step 1

Apply a thin layer of Mod Podge to each pen or marker. Cover any area that you wish to put glitter on. Make sure you get close to the pen cap as well, so it's entirely ready for glitter.
Step 2

Pour the glitter over the Mod Podge coated area. Make sure to tap the pen a little to shake off any excess, and then set it aside to dry.
Step 3
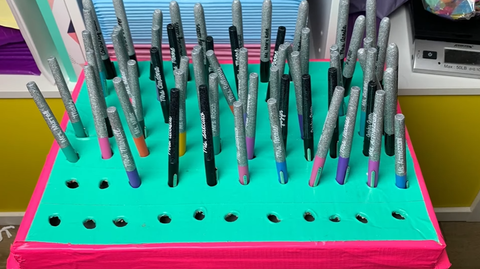
Set the pens upside down to dry. Continue this process until all of your pens have been covered with glitter.
Step 4

Once your pens have dried, it's time to put them on the turner. Take your pool noodle and cut it to fit your cup turner. Remove the caps from the pens and markers and cut two-inch strips of duct tape for each pen cap. Apply duct tape to the top of the pen cap while leaving the pen cap opening uncovered. Apply the duct-taped pen cap to the pool noodle with even spacing to keep it balanced on the turner. Make sure the pool noodles fit snugly on the turning rod. You don't want any of your pool noodles wobbling around on the rod, as this can affect how evenly the resin cures.
Step 5

So, once you've found a good fit, you can begin adding resin to your pens. Mix your resin and fire up your turner. You'll want to apply a thin layer of resin to each pen while wearing gloves. Cover the entire glittered area evenly. Smooth it out with your finger and go around the top of the pen. Ensure that the entire glittered area on the pen is completely covered with resin in a nice, even layer. Then, insert each pen or marker into the cap of the pen turner and leave the turner on until it's fully cured.
PRO TIP: We do not recommend using a heat gun or torch to pop air bubbles like most people do. When working with these pens, you risk drying out the ink inside the casing if you apply heat externally. If you must pop air bubbles, use a straw to blow the bubbles out or simply smooth it out with your finger.
Step 6

Once the pens have cured, turn off the turners. Take the pens out and replace the caps on each pen. You may want to keep extra caps, so you don't have to disassemble the foam rollers every time you remove the pens.
Step 7

Make sure the pens are really smooth by running your finger over each pen to check for any lumps or sharp areas. If you see a little sharp piece of glitter poking through or a lump of some kind, use the sandpaper and sand that area down.
Step 8

If you want to personalize the pens and add names, you can use a machine to cut out each name from vinyl. Put a transfer tape over the name, peel it away from the white paper backing, and put the vinyl on the pen. Make sure it's nice and straight, press it down, and then peel the transfer tape off.
Step9

After all the vinyl has been applied, seal it in with another coat of resin. This is the second and final resin application process, so you'll simply repeat what you did before. Apply a thin coat, spread it out evenly, and allow it to cure.
Final Thoughts

There you have it! You now can make some one-of-a-kind personalized resin glitter pens that are perfect for parties, weddings, or just to give as gifts. They're an excellent idea for any occasion, and with the process being so simple, they will be sure to please anyone who receives them as a gift.
Thank you to Lydia of @clevergirlscraft for this great tutorial. Look for more how-to tutorials coming soon!!!
For a full video tutorial of this project, watch Clever Girls Craft’s video below:


Hi Terri,
A tumbler or cup turner is a device that is used by crafters to coat tumblers with epoxy resin. You can attach the tumbler to the turner and it turns the tumbler very slowly while the resin cures. This allows you to coat the surface with resin evenly.
What is a cup Turner?
Leave a comment