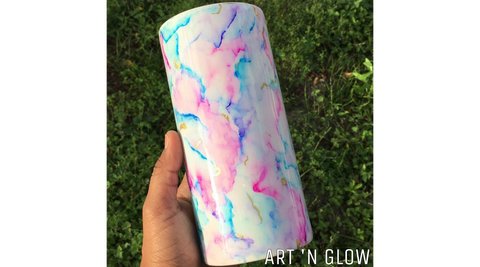
How To: Marble Ink Resin Vase

Click here to purchase our epoxy resin!
Here at Art 'N Glow, we love to show off what people have done with our products! Today, our friend @sweetartcrafts_ is taking us step-by-step on their process to customize a regular vase using alcohol inks and Art 'N Glow epoxy resin for a professional-looking marbled effect.
Materials Needed
- Art 'N Glow Epoxy Resin Kit
- Alcohol inks
- Alcohol blending solution
- White spray paint
- Vase
- Cup turner
- 91% rubbing alcohol
- Various-sized paintbrushes
- Several small disposable cups
- Stirring sticks
- Gloves
- A level
- Sandpaper (400-800 grit)
- Heat gun
- Clear crafting glue (optional)
- Gold flakes (optional)
Step 1: Apply a single layer of spray paint to your vase by turning the vase upside down, on a piece of cardboard or newspaper, and then spraying outside. Make sure that it is fully dried before moving onto the next step!
Step 2: Apply a thin layer of the alcohol blending solution to your vase using a regular paintbrush. Allow the vase to dry to a tacky consistency for the best results.
Step 3: Using fine paintbrushes, apply the alcohol inks in various wavy lines.
Step 4: Use a small paintbrush, dipped in 91% rubbing alcohol, to gently "pat" the alcohol ink lines to spread the color out and create the marbled effect. Only work with one color at a time to prevent the colors from blending too much. You can also use a paper towel to remove excess rubbing alcohol from your brush before applying to the vase so the colors don't spread further than you'd like.
Step 5: To add more color, allow the first layer to dry for a few minutes. Then you can apply more lines of alcohol ink and continue to blend as you go using the rubbing alcohol.
Repeat Steps 3-5 until you've covered the entire surface of the vase.
Step 6 (optional): You can add some gold accents to your vase by using crafting glue to apply the gold flakes in various places. Allow the craft glue to dry, and then dust off the excess gold flake from the surface using a completely dry paintbrush. You could also paint on gold alcohol ink in small lines and spots if you'd like even more gold accents.
For best results, allow your vase to dry for at least 12 hrs before applying your resin in the following steps.
Step 7: Set up your vase on your cup turner before mixing your epoxy. Be sure that you have something beneath the vase (i.e. a piece of cardboard or plastic tablecloth) to catch any drippings from the epoxy resin, and verify that the table is level.
Step 8: Measure equal parts resin and hardener by volume to create the epoxy resin mixture you will use in the next step. It is important to make sure this mixture is stirred thoroughly by scraping the sides and bottom of your mixing vessel and stirred until there are no streaks remaining. Allow the mixture to sit for 5-10 minutes after stirring so that it is a little more viscous and easier to apply.
Step 9: Turn on the cup turner so that the vase is rotating, and carefully pour the epoxy resin mixture onto the surface while using a gloved hand or foam brush to spread the mixture smooth and even. Be sure to apply the epoxy resin, in a very thin layer, to the bottom of the vase as well!
Step 10: Use a heat gun or artist's torch in a sweeping motion across the surface of your vase to remove any bubbles that appear in your epoxy resin.
Step 11: Allow the epoxy resin to cure with the vase spinning on the cup turner for about 14-24 hours before continuing.
Step 12: Use the sandpaper to smooth out any rough or uneven areas on the surface of your vase. After sanding, wipe down the surface with rubbing alcohol, or soap and water, before applying the final coat of epoxy resin.
Repeat Steps 8-10 to apply the final coat, and continue to smooth out any dips or blemishes that may appear on the surface of the epoxy resin until it begins to solidify.
Step 13: Allow the epoxy resin to cure with the vase spinning on the cup turner for about 12 hours. You can then remove the vase from the cup turner and continue to let it cure for another 24-48 hrs.
Step 14: Your alcohol ink resin vase is complete! Add some beautiful flowers, feathers, or any other unusual decor idea you may have.

Explore the endless possibilities with different color combinations and accents. Don't forget to tag your final product with #artnglow on social media so we can see all of the spectacular designs that you create!


