How to Create A Glow-In-The-Dark Acrylic Pour Painting featuring Megan Hogeman

What is better than a beautiful acrylic pour painting - how about one that glows?! Let's follow along with artist Megan Hogeman as she creates an amazing glowing piece of art.
Let's start creating!
Materials Needed
- Art 'N Glow Glow Paints (your favorite colors)
- Artist's Torch
- Fresh (unprepped) White Stretched Canvas
- Regular Premium Acrylic Paints
- Floetrol
- Silicone Oil
- Water
- 16 Oz Plastic Cup
- Spray Acrylic Gloss Finish or Art 'N Glow Epoxy Resin
- nails and hammer (optional)
- trash bag / plastic sheeting / drop cloth (optional)
- picnic net covers (optional)
Prepare Your Workspace
Lay down a heavy-duty trash bag first (just to be safe), then if you want you can also add a drop cloth on top. For every paint pour Megan does, she flips over the canvas and hammers in a small nail in every corner, leaving about 1/2” of the nail sticking out. This is to ensure that she can get her fingers under the painting after the paint is poured so she doesn't put big fingerprints on the side and mess up the beautiful flow of the paint and cells that pour over the sides. It gives your painting little temporary table legs! We love this tip!! If you do not have a hammer and nails you can use small plastic cups under each edge of your painting.
Create Your Acrylic Pour Painting
Step 1. Mixing the paints: For the non-glow paints, use about 80% paint, 15% Floetrol and 5% water. Then, add 1-2 drops of silicone oil. For the glow paints, use 98% paint, a splash of Floetrol and no water. Megan believes that the glow paints already have such a great consistency, and you also don't want to dilute the color/glow power. (We agree :))

Step 2. Prep: Cut approximately 2 inches off the top of your 16 oz plastic cup. Put the cut Solo cup circle in the middle of the UNPREPPED canvas with NO paint base.
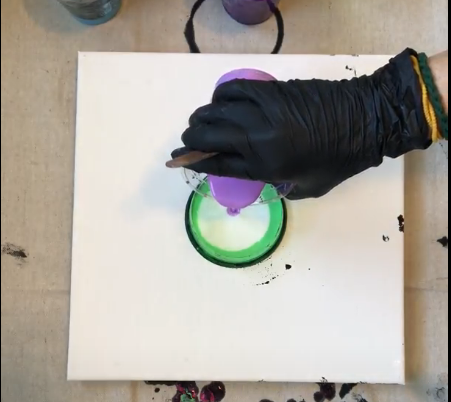
Step 3. Pour: Pour enough paint to fill the circle and alternate varying colors with decent amounts of paint. Make sure to use colors that differ greatly from the previous color. This a good way to prevent a muddy painting.

Step 4. Keep Layering: You will see the magic start to happen as you layer the colors in the solo cup circle and they begin to seep out from underneath! Once you have plenty of paint seeping out the sides to cover more than enough space on your canvas, lift up the circle and lightly drag over the “inside the circle” paint to create cells that match the seeped paint outside to cup top on your canvas.

Step 5.Tilt the Canvas: This is the tricky part…..you want to try and stretch the paint to the corners by slowly tipping the canvas in all directions. Then, in a quicker than slow motion, tip the paint to roll over the corners and then tilt back to keep some paint on the canvas after the paint flows over the sides. Repeat until all sides of the canvas is covered. It’s looking good at this point! You only want to tip your painting a few more times to get the look you want and keep enough paint on your canvas.

Step 6. Torch: For the final finishing touch, quickly torch in a sweeping motion 6-8 inches above your painting to pop any bubbles AND it will create more tiny cells too!
Step 7. Wait and Seal: Let the painting dry overnight. Megan uses picnic net covers so the painting gets the air flow that it needs but, little dust particles won’t get anywhere close to it!
Finally, the next day, take the painting outside or to a well ventilated area and spray 3 full coats of clear sealer (wait at least 20 minutes in between each application). Megan used Krylon’s Crystal Clear for this project. She likes this method of sealing for this type of project because you can still feel the texture of the painting but, it makes the colors pop and seals it to perfection!
For a different effect, you can coat your acrylic pour paintings with Art 'N Glow Clear Casting & Coating Epoxy Resin for a glossy clear finish.
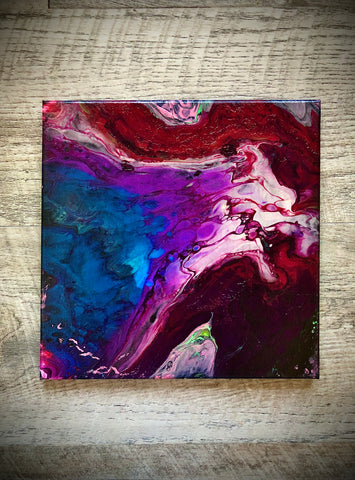
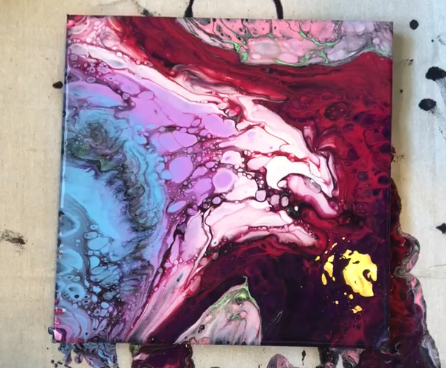
Check out Megan's finished masterpiece!